eBOL Integration Guide
This guide walks through how to integrate with the Opendock Nova API to support electronic Bill of Lading (eBOL) workflows. By the end, your system will be able to generate a BOL document for a given appointment, have the driver sign it during check-out, and receive the signed Proof of Pickup/Delivery (PoP/D) back automatically.
Before proceeding, make sure you are familiar with the Webhooks documentation. This guide assumes you have already worked with the Opendock team to register the necessary webhooks for your warehouse(s).
Overview
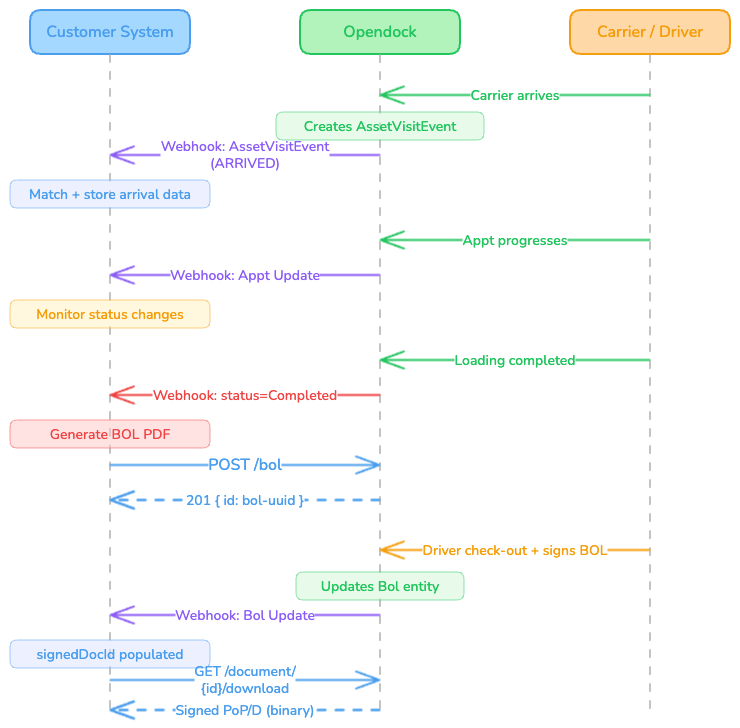
The eBOL flow connects three moments in an appointment's lifecycle:
- Arrival — A carrier physically arrives and Opendock records an
AssetVisitEventof typeArrived. Your system collects initial data (e.g., seal number, trailer number) to hydrate the BOL document. - Completion — The warehouse marks the appointment as
Completed. Your system generates and uploads the BOL via the Opendock API. - Check-out — The driver reviews and signs the BOL on the facility tablet. Opendock notifies your system that the signed document is available for retrieval.
The key constraint is that the BOL must exist in Opendock before the driver begins check-out. If no BOL has been created for the appointment, the driver will not be prompted to sign anything. Your integration is responsible for creating it at the right time.
Recommended Integration Flow
The flow described below is a recommendation. Warehouses may adjust the timing and triggers to fit their operational needs, as long as the BOL is created before the carrier reaches the check-out step.
Step 1: Subscribe to Webhooks
Register the following webhooks with your Opendock account manager (see Webhooks — Registration Process):
| Webhook | Entity | Operation | Purpose |
|---|---|---|---|
| Asset Visit Event (arrival) | AssetVisitEvent | Create | Signals that the carrier has physically arrived; use eventType == "Arrived" to filter relevant events and capture arrival data (trailer number, license plate, company) |
| Appointment updated | Appointment | Update | Monitors the appointment lifecycle; your system reacts when status transitions to Completed |
| BOL updated | Bol | Update | Notifies your system when the driver signs the BOL, making the signed document available for download |
Each webhook registration is scoped to one entity + one operation + one organization. A single registration covers all warehouses within your org — you do not need a separate registration per warehouse.
Step 2: Collect Arrival Data (AssetVisitEvent Webhook)
Rather than listening for AssetVisit creation, subscribe to AssetVisitEvent creation and filter for eventType == "Arrived". This approach is more reliable because an AssetVisit record may be created in the system before the carrier physically arrives at the gate — the Arrived event represents the actual physical arrival.
Your webhook endpoint receives a payload like:
{
  "entity": "AssetVisitEvent",
  "operation": "Create",
  "data": {
    "id": "7b9b106c-26d4-47bc-94bf-bdebd28758ca",
    "eventType": "Arrived",
    "assetVisitId": "180dc41e-5765-4a04-ad40-7b0bdca47f05",
    "orgId": "7e77fbe1-9517-44ce-b08b-5a18b478b79f",
    "assetContainerId": null,
    "spotId": null,
    "createdBy": null,
    "createDateTime": "2026-04-06T19:35:15Z",
    "lastChangedDateTime": "2026-04-06T19:35:15Z"
  },
  "sentAt": "2026-04-06T12:35:15.847-07:00"
}
Note that the AssetVisitEvent payload only contains event metadata — it does not include arrival details such as trailer number, license plate, or carrier company. Those fields belong to the AssetVisit entity itself.
Your system should discard any event where eventType is not "Arrived" and, for matching events:
- Fetch the AssetVisit using the
assetVisitIdfield:GET /asset-visit/{assetVisitId}. The response will contain the arrival details (trailer number, license plate, carrier company, etc.) needed to populate the BOL. - Match to an existing shipment using the
appointmentIdreturned on theAssetVisitentity, which links the arrival to a pre-existing appointment in your system. - Store relevant data — fields like trailer number, seal number, and carrier company name will later be used to populate the BOL document.
Depending on the warehouse's configuration, additional data such as seal numbers may be captured through Custom Forms completed during the appointment. You can retrieve custom form data via the /custom-form endpoint once the appointment reaches a later stage.
Step 3: React to Appointment Completion (Appointment Webhook)
As the appointment progresses through its lifecycle (Requested → Scheduled → Arrived → InProgress → Completed), your webhook endpoint receives an update each time the status changes. The payload includes a status field and a statusTimeline object showing timestamps for each transition.
Your system should watch for the transition to Completed:
{
  "entity": "Appointment",
  "operation": "Update",
  "data": {
    "id": "0347e2b7-f9b4-4c1d-8774-bdbec96cc75b",
    "status": "Completed",
    "statusTimeline": {
      "Requested": "2026-02-11T19:40:00.000Z",
      "Scheduled": "2026-02-11T19:40:00.000Z",
      "Arrived": "2026-02-11T19:41:00.000Z",
      "InProgress": "2026-02-11T19:50:00.000Z",
      "Completed": "2026-02-11T20:30:00.000Z",
      "Cancelled": null,
      "NoShow": null
    },
    "refNumbers": ["AB21890128", "8210981"],
    "customFields": [...],
    "customFormData": [...],
    ...
  },
  "sentAt": "2026-02-11T13:30:02.396-07:00"
}
Once you detect "status": "Completed", proceed to generate and upload the BOL.
Step 4: Create the BOL (API Call)
Generate your BOL document (typically a PDF) using the shipment data, arrival data collected in Step 2, and any custom form data retrieved from Opendock. Then upload it using the BOL creation endpoint:
POST /bol
Content-Type: application/json
Request body:
{
  "appointmentId": "0347e2b7-f9b4-4c1d-8774-bdbec96cc75b",
  "documentUrl": "https://your-system.com/documents/bol-135939.pdf"
}
| Field | Type | Required | Description |
|---|---|---|---|
appointmentId | string (UUID) | Yes | The ID of the appointment this BOL belongs to |
documentUrl | string (URL) | Yes | A publicly accessible URL pointing to the BOL PDF document. Not all BOL templates are supported automatically — see Supported BOL Templates for examples of accepted formats. |
Response (201 Created):
{
  "id": "3fa85f64-5717-4562-b3fc-2c963f66afa6"
}
Store the returned id — this is the BOL entity ID you will use to retrieve the signed document later.
The documentUrl must be publicly accessible (or accessible to Opendock's servers). Opendock will fetch the PDF from this URL and store it internally. If the URL is unreachable, the BOL creation will fail.
Step 5: Driver Signs the BOL at Check-out
This step happens entirely within Opendock — no action is required from your integration.
When the carrier goes through the check-out process at the facility (typically on a tablet at the guard shack), the following occurs:
- The driver is identified by reference number and/or tractor license plate.
- If configured, the driver fills out any required custom form fields.
- The driver is presented with the BOL document for review.
- The driver signs the BOL (name entry + signature confirmation).
- Opendock generates the signed Proof of Pickup/Delivery (PoP/D) and stores it as a new document linked to the BOL entity.
After signing, the BOL entity is updated with a signedDocId pointing to the new signed document.
Step 6: Retrieve the Signed Document (BOL Webhook)
When the driver signs the BOL, Opendock updates the Bol entity with the signed document reference. Your webhook receives:
{
  "entity": "Bol",
  "operation": "Update",
  "data": {
    "id": "3fa85f64-5717-4562-b3fc-2c963f66afa6",
    "appointmentId": "0347e2b7-f9b4-4c1d-8774-bdbec96cc75b",
    "warehouseId": "d4e4937e-5661-4599-9480-84e1d4af9d2c",
    "orgId": "7e77fbe1-9517-44ce-b08b-5a18b478b79f",
    "signedDocId": "f83f5e1f-4b6b-48df-8c7a-842fb318880d",
    "originalDocId": "6bcb1d88-f9bf-493c-8fce-769d344ccfed",
    ...
  },
  "sentAt": "2026-02-11T13:45:40.088-07:00"
}
The key field is signedDocId — when it transitions from null to a UUID, the signed document is available.
Retrieving BOL Details
You can fetch the full BOL entity, including references to both the original and signed documents:
GET /bol/{bolId}
Response (200 OK):
{
  "id": "3fa85f64-5717-4562-b3fc-2c963f66afa6",
  "originalDoc": {
    "originalDocId": "6bcb1d88-f9bf-493c-8fce-769d344ccfed",
    "externalKey": "https://your-system.com/documents/bol-135939.pdf"
  },
  "signedDoc": {
    "id": "f83f5e1f-4b6b-48df-8c7a-842fb318880d",
    "externalKey": "s3://opendock-docs/signed/..."
  }
}
Downloading the Signed Document
Use the signed document's ID to download the actual file:
GET /document/{id}/download
This returns the binary file content (application/octet-stream) of the signed PoP/D document.
Sequence Diagram
Supported BOL Templates
Not all BOL document formats are supported out of the box. Below are examples of accepted templates that have been validated with the eBOL signing flow.
If your BOL template differs significantly from the examples below, please contact your Opendock account manager to verify compatibility before going live.
The following templates have been validated with the eBOL signing flow: