Appointment Validation
Appointment Validation (also known as PO Validation or Reference Number Validation) is a feature allowing facilities to hook into the appointment creation (and update) lifecycle of Opendock, to enforce their own custom business rules. A common use case is enforcing an accurate PO # or reference # input before scheduling an appointment, however many other things about the appointment can be validated such as the start date/time, load type, custom fields, and more. This enforcement is carried out for both carrier and warehouse scheduling users.
Facility operators usually request this feature in order to protect their schedule from abuse and avoid incorrect appointment bookings. Also, matching on a valid and unique PO/Ref Number will provide additional functionality of being able to share more data back and forth between your other systems and Opendock.
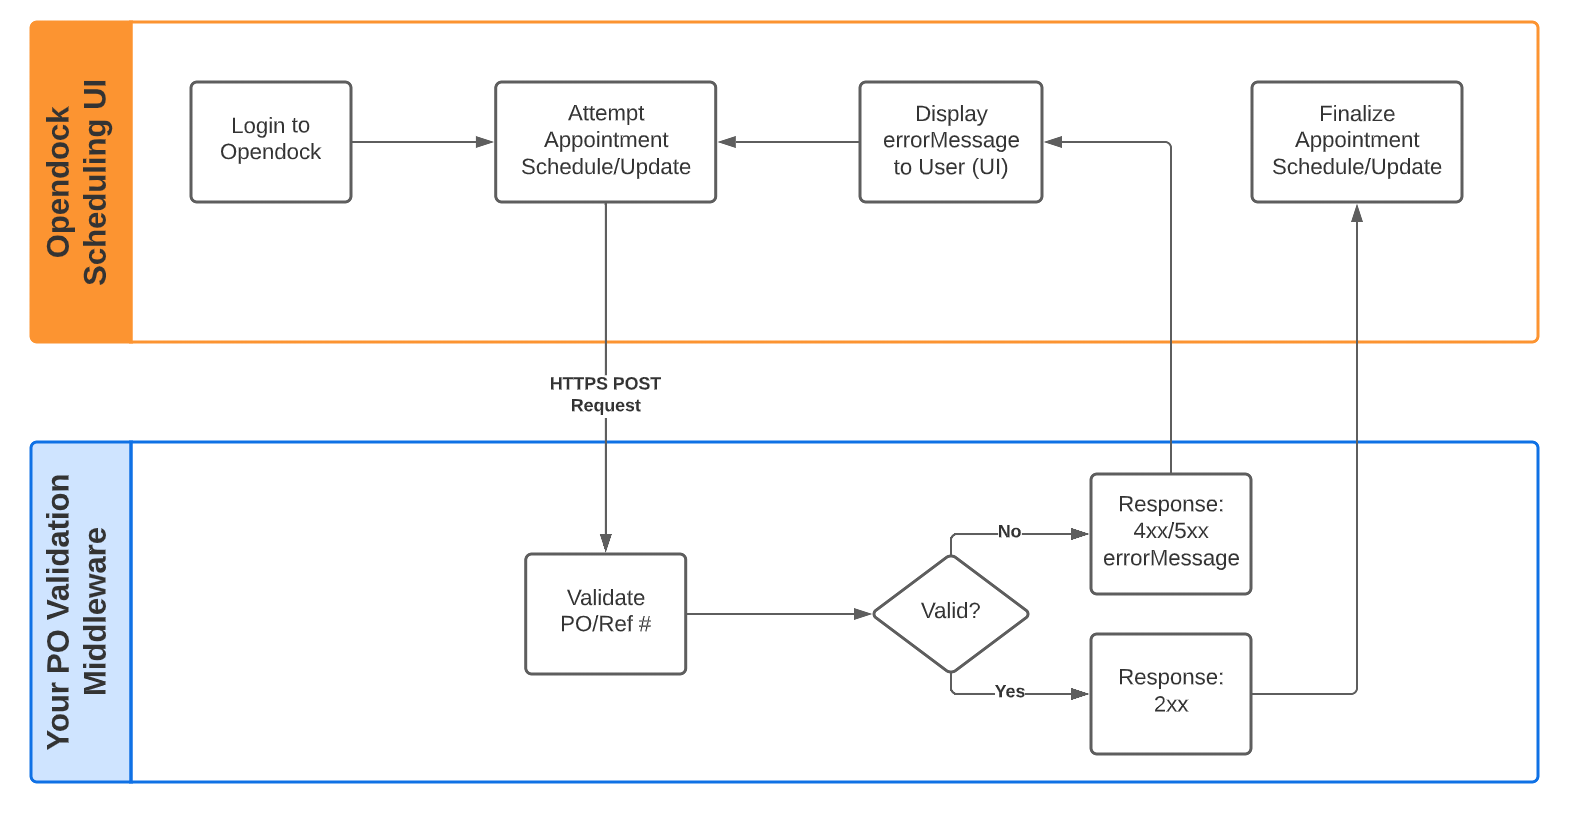
The ultimate design philosophy is that Opendock doesn't store this data but will instead send the "appointment context" (information about the appointment to be created or updated) to your middleware system (a webserver you must set up), which will communicate back to Opendock about whether the appointment is valid or not.
By default, when referring to "Appointment Validation" we are referring to the V2 protocol. For information regarding the V1 (Legacy, spreadsheet based) protocol, jump to Appointment Validation V1.
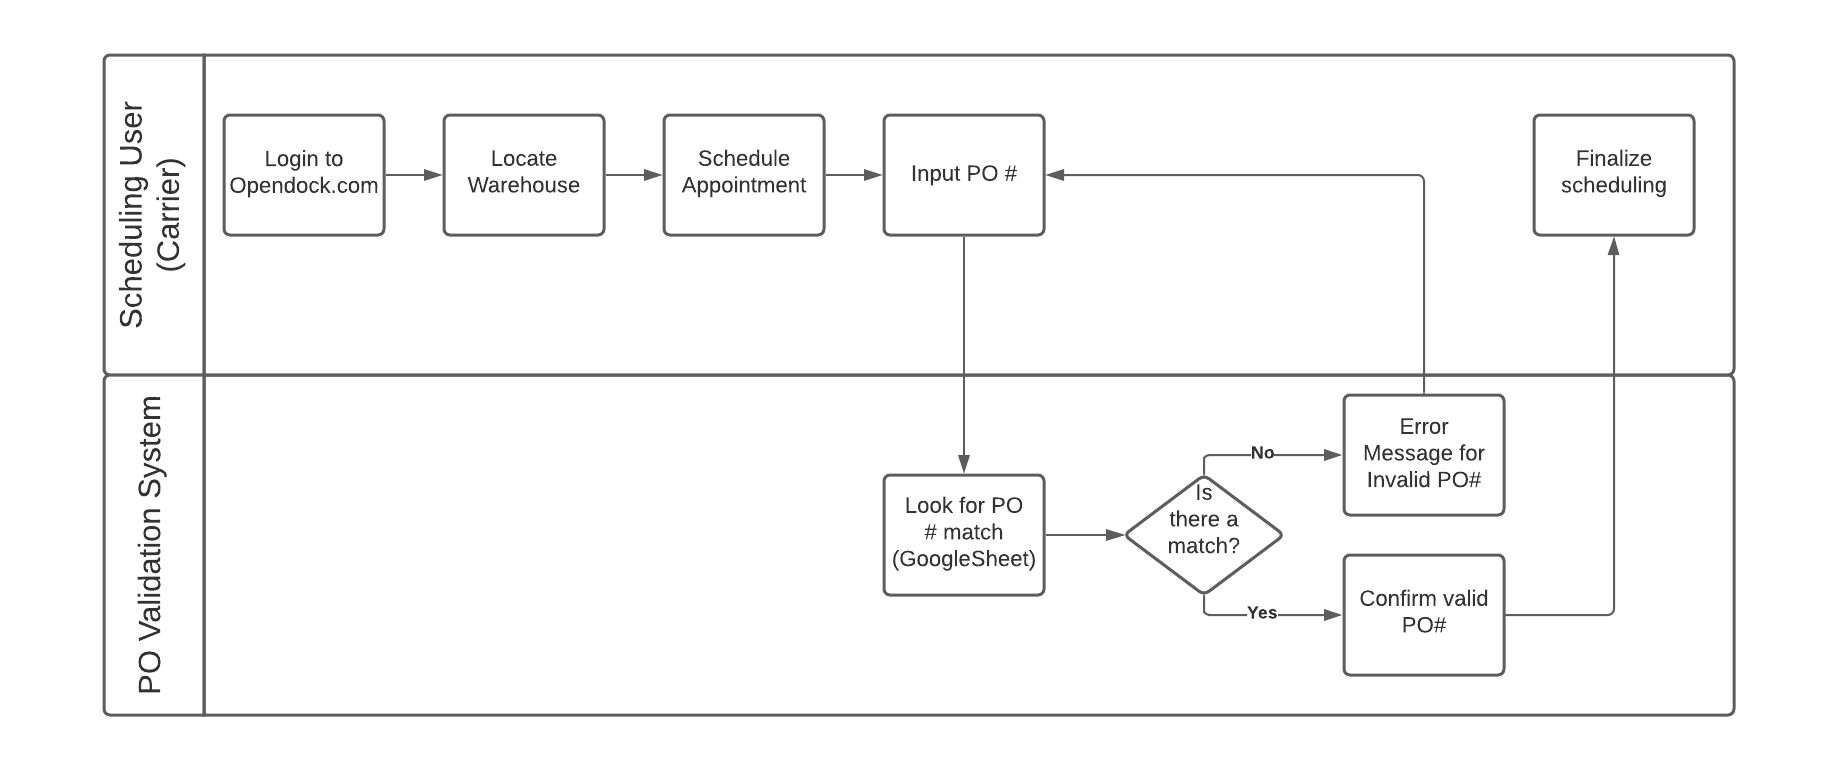
This diagram illustrates the major concepts of this "Appointment Validation Protocol":
Your Custom Middleware
How you decide to build your middleware is totally up to you and your engineers. This protocol is language/platform agnostic as it only relies on a simple HTTPS POST request. Opendock just needs to know the URL of your web server ( see Opendock Configuration section below), and then it will send requests to it when a user is attempting to create (or update) an appointment. Your middleware can then reach out to any of your systems (e.g. WMS/TMS/ERP/etc.) to fetch data and make a decision about the validity of the appointment.
Appointment Validation Protocol V2
In order for Opendock to validate an appointment, your middleware must implement a publicly accessible HTTPS endpoint that can accept a POST request.
The URL can be whatever you like as long as the protocol is HTTPS, and you do not specify an explicit port.
For example, it could be something like this:
https://www.my-company.com/opendock-validator
When an appointment creation or update is being attempted, Opendock will make a POST request to the URL you provided. Authentication is not required (see Security section below), however HTTPS protocol must be used.
The body of the request to your server will be a JSON object containing the relevant information about the appointment (
known as the "appointment context"), as well as the "action" which will be either "create" or "update".
The appointment information will appear in two objects under the keys: appointmentFields and existingAppointment.
appointmentFieldswill contain all the "proposed" field values for an appointment that is about to be created, or for an update, it will have the fields that are about to be changed.existingAppointmentwill benullfor appointment creation, but for an appointment update it will contain the existing data for the appointment.
The Reference Number (PO number) can, for example, be read out from appointmentFields.refNumber, and then could be
checked against an external system/database for validity (typical "PO Validation" use case). But you can also utilize
all of this other appointment "context" data to help you make a decision about the appointment. For instance, you
could verify the correct loadTypeId, or make sure the "start" Date/Time is valid for the given shipment PO. It all
depends on your business needs, and with this system, you will have all the data at your fingertips to make that
decision.
Note that the appointment data fields follow the same "shape" as the Appointment entity in our REST API.
Examples
Payload for a pending appointment creation
{
   "action":"create",
   "appointmentFields":{
      "start":"2022-11-07T19:00:00.000Z",
      "userId":"91df55e9-b324-4ae0-9061-32058763e2a6",
      "loadTypeId":"b238b21f-4f60-4810-b81f-9133d3c8c1d0",
      "dockId":"5cb3c325-74fc-4f65-b829-8ae1affe75ca",
      "refNumber":"1234",
      "tags":null,
      "createdBy":"a1badb81-39d7-4695-8e42-56efcc4040e8",
      "lastChangedBy":"a1badb81-39d7-4695-8e42-56efcc4040e8",
      "orgId":"6d1467d4-c987-4b79-9d12-d5998c80e06f",
      "end":"2022-11-07T20:30:00.000Z",
      "statusTimeline":{
         "Scheduled":"2022-11-04T20:45:42.801Z",
         "Arrived":null,
         "Completed":null,
         "NoShow":null,
         "Cancelled":null
      }
   },
   "existingAppointment":null
}
Payload for a pending appointment update
{
   "action":"update",
   "appointmentFields":{
      "refNumber":"ABC98765",
      "lastChangedBy":"a1badb81-39d7-4695-8e42-56efcc4040e8",
      "orgId":"6d1467d4-c987-4b79-9d12-d5998c80e06f",
      "dockId":"5cb3c325-74fc-4f65-b829-8ae1affe75ca",
      "loadTypeId":"b238b21f-4f60-4810-b81f-9133d3c8c1d0"
   },
   "existingAppointment":{
      "id":"11bc0240-ff55-49d2-b872-4522271e4b1d",
      "start":"2022-11-07T19:00:00.000Z",
      "end":"2022-11-07T20:30:00.000Z",
      "refNumber":"ABC12345",
      "createDateTime":"2022-11-04T20:45:42.938Z",
      "createdBy":"a1badb81-39d7-4695-8e42-56efcc4040e8",
      "lastChangedDateTime":"2022-11-04T20:45:42.938Z",
      "lastChangedBy":"a1badb81-39d7-4695-8e42-56efcc4040e8",
      "isActive":true,
      "tags":[
         "late",
         "damaged"
      ]
   }
}
Response: Success or Failure
Once your middleware has decided if an appointment is valid or not, it should then reply to the POST request. If the HTTP response code is “2xx”, then the appointment is considered valid, and the appointment scheduling will proceed. Any other HTTP return code (4xx, 5xx, etc) results in an error and prevents the appointment from being scheduled.
You should also return a custom error message, which the Opendock UI will display to your users. This allows your middleware to give them specific information about what went wrong, and how to correct it. All you have to do is include a JSON object with an errorMessage string value as part of your response (along with 4xx or 5xx code). For example:
{
   "errorMessage":"PO Number must be at least 6 characters long"
}
Currently, Opendock requires your validator to respond within 8 seconds, or a timeout error will occur. If your systems cannot reliably respond within this time window, you should consider a different approach to integrating with Opendock.
Security Concerns / Passcode Feature
Some users may be worried about having to expose a public web service. To alleviate that this protocol requires HTTPS connections, to eliminate man-in-the-middle style attacks.
However, this doesn't stop unknown parties from sending requests to your validator service. You can of course make your URL as obscure as possible to alleviate this, however if this isn't enough, then you may want to use the optional " Passcode" feature.
All you have to do is set a "passcode" of your choice (it can be any string, but should be considered a secret within your company), into your Warehouse configuration (see Opendock Configuration section below). Once that is set, then every POST request Opendock makes to your validator will include your passcode as a Bearer token on the * Authorization* header. This way, your middleware can receive the passcode and verify its correctness.
To disable this feature, simply clear out the passcode field in your warehouse config, and then Opendock will no longer set anything in the Authorization header.
For example, if you set your passcode to 123456, then Opendock will send POST requests to your middleware with the Authorization header set to:
Bearer 123456
Opendock Configuration
Once you're ready to enable Appointment Validation:
- Go to the individual Warehouse's Info page
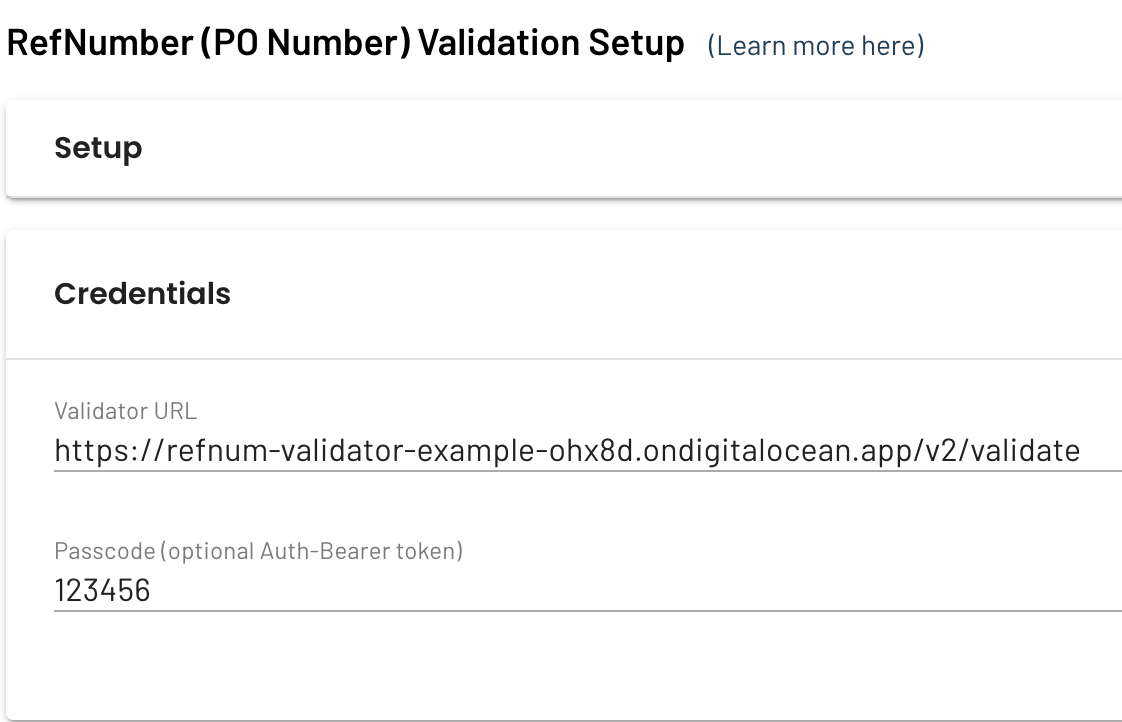
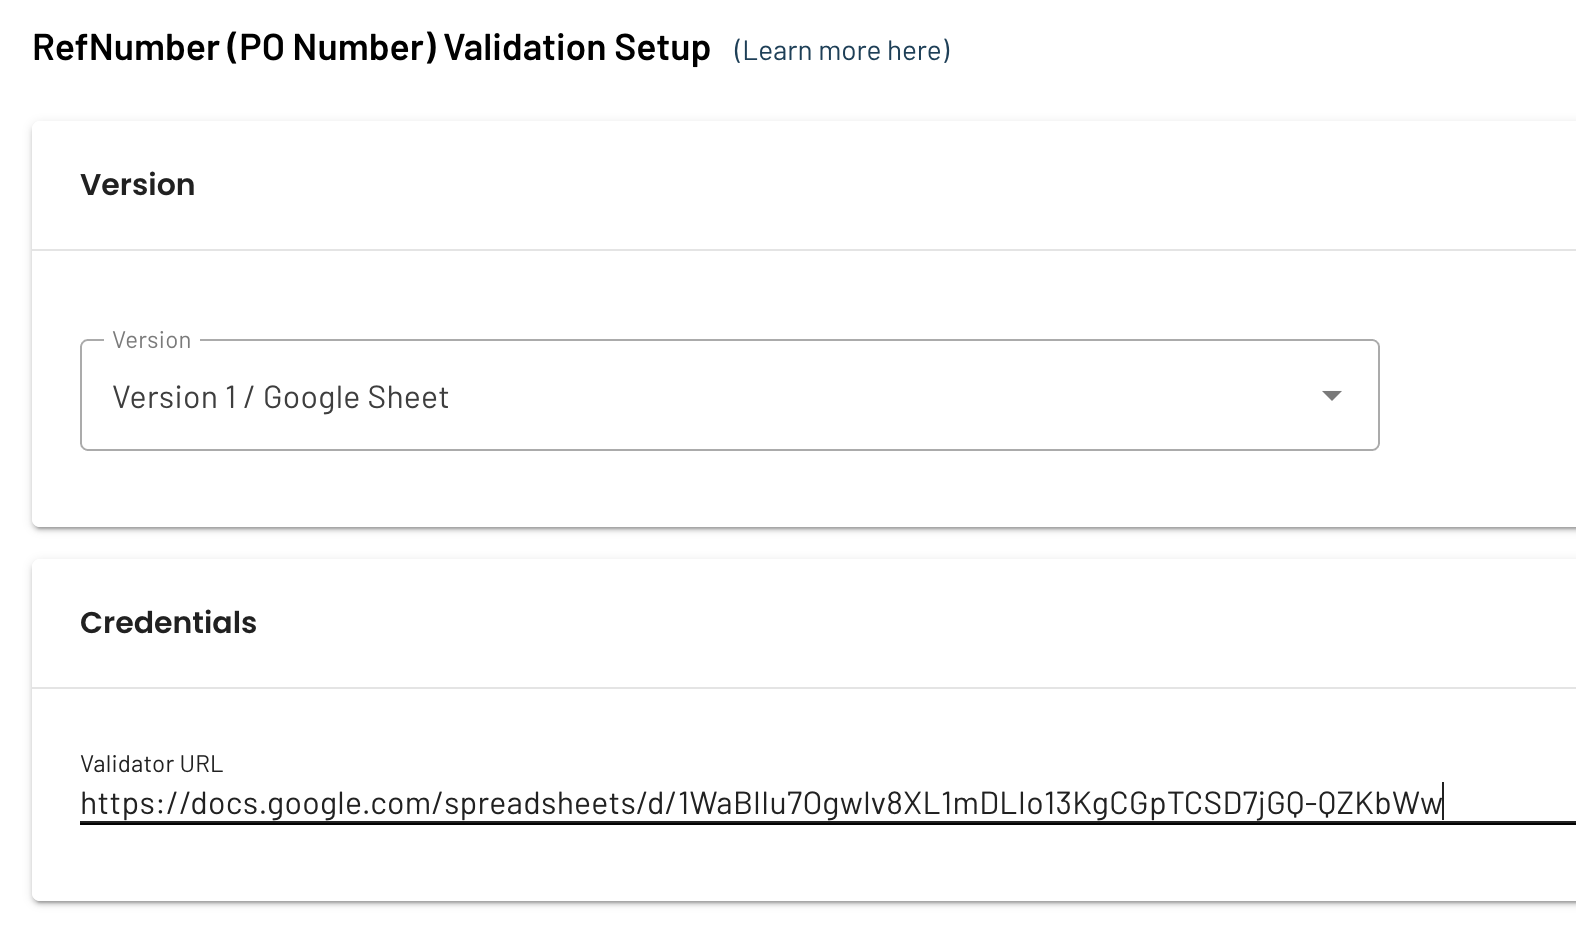
- Scroll down to the RefNumber Validation Setup section
- Within the Setup section, make sure Version is set to: Version 2
- Within the Credentials section, enter your validator's URL into the Validator URL field
- If you wish to use the Passcode feature (see security section above) then fill this field out as well (otherwise leave it blank)
- Within the Notifications section, you can configure a Technical Contact Email Address and a Technical Contact Email Throttle Minutes value.
- Click the Save button
At this point, whenever an appointment is created or updated for this warehouse, your validator will get invoked. To test, just go attempt to create an appointment with a known mistake, and ensure you see the error message returned from your validator. Then create a "good" appointment and confirm it gets scheduled properly.
Technical Notifications
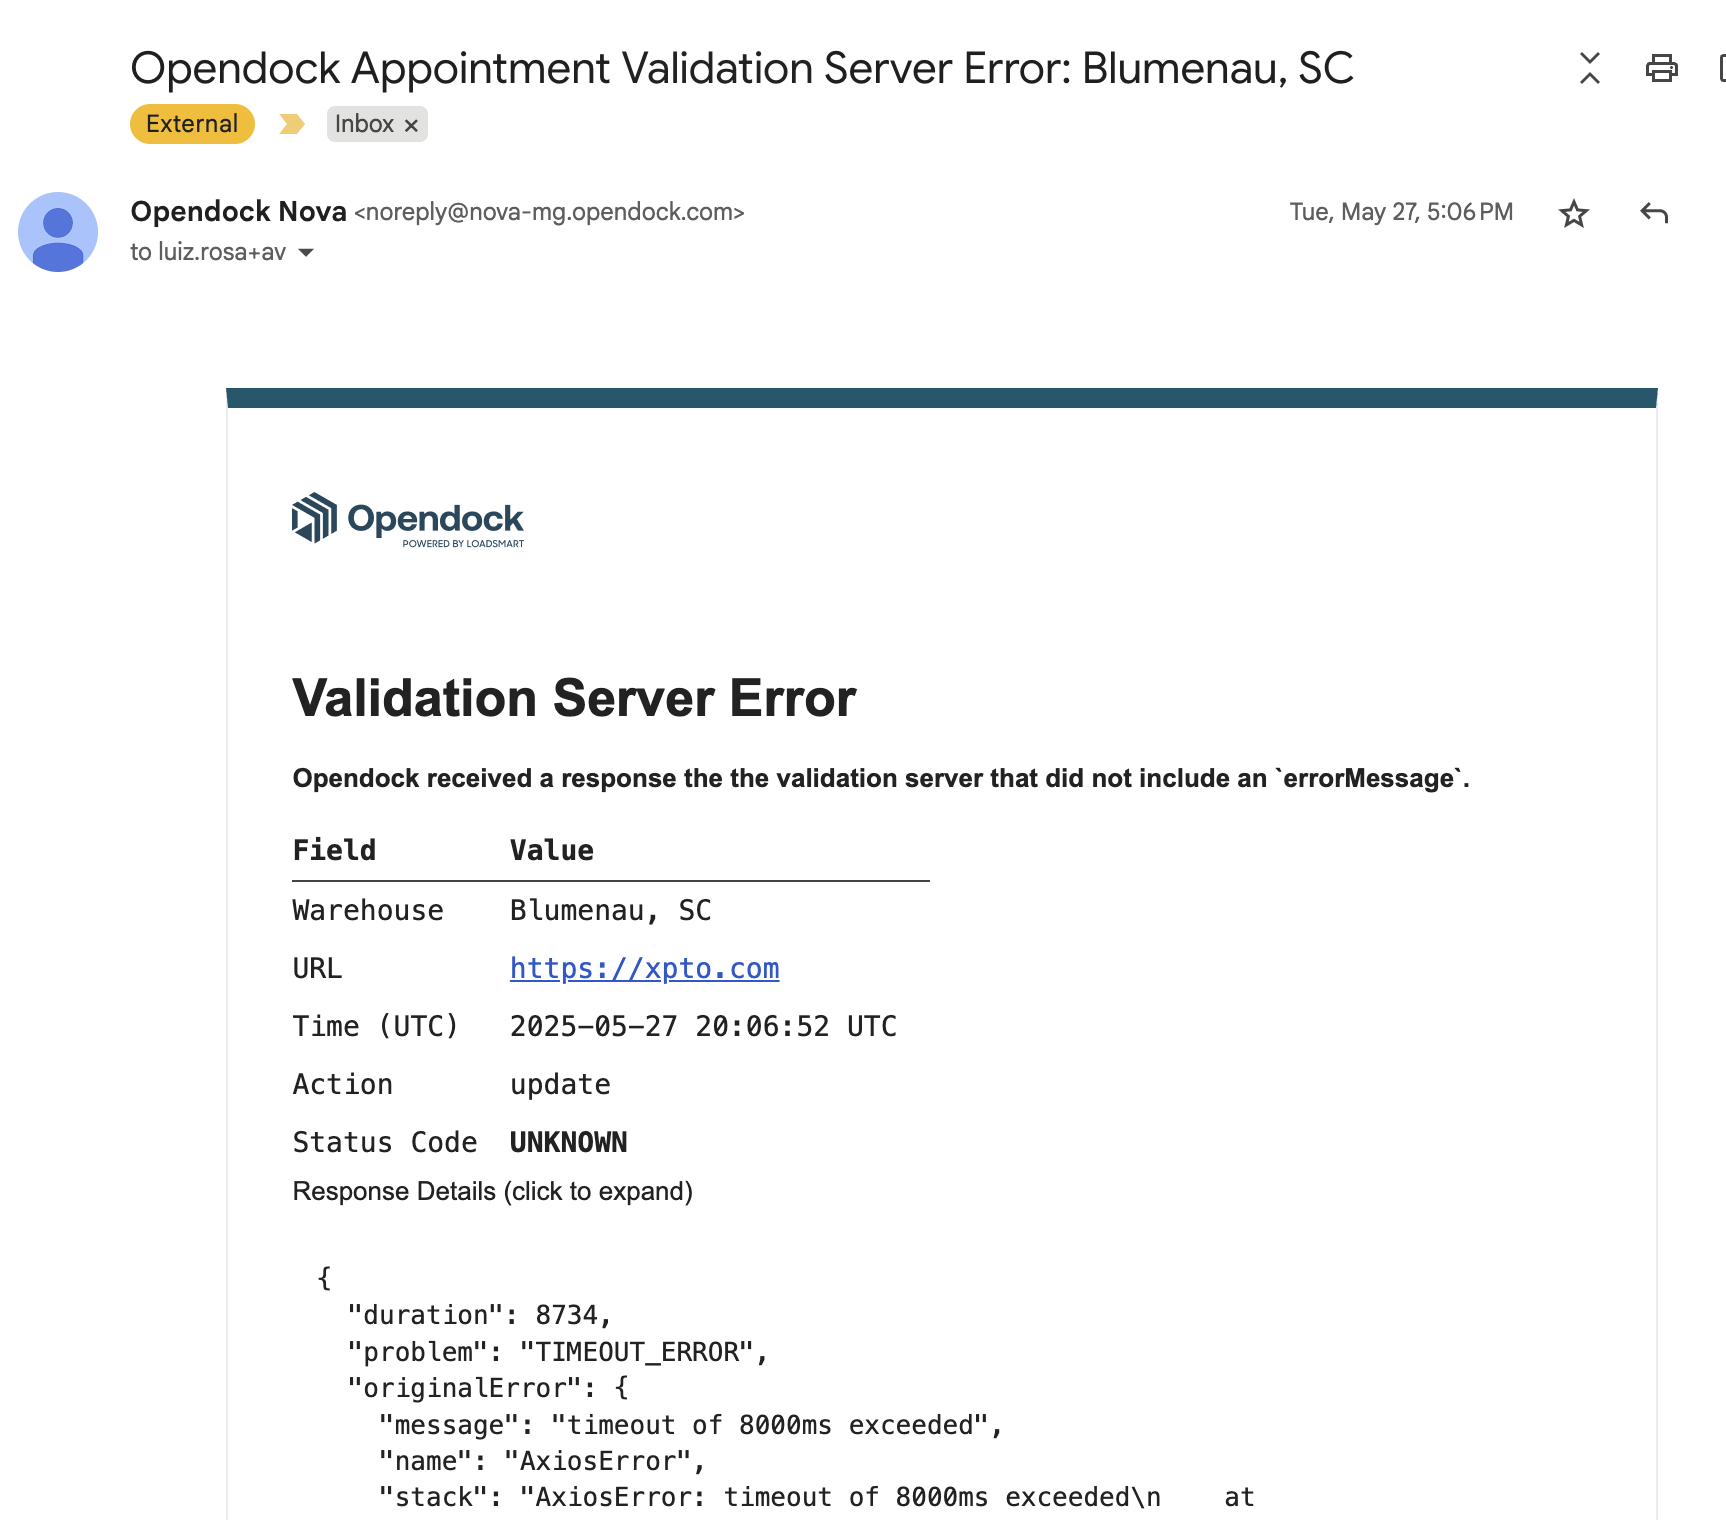
Opendock provides a notification system to alert you about unexpected errors that may occur during appointment validation. This helps you monitor the health of your validator and respond to issues proactively.
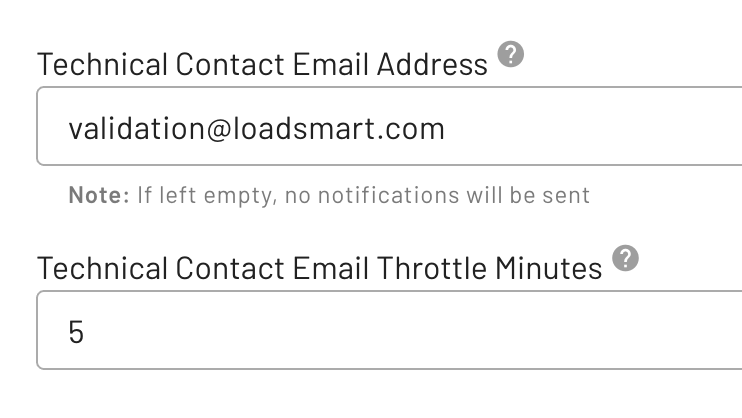
Technical Contact Email Address
You can configure a Technical Contact Email Address in your warehouse settings to receive notifications about unexpected errors. These notifications are sent when your validator encounters issues such as:
- Timeouts (when your validator doesn't respond within 8 seconds)
- Internal server errors (500 status codes)
- SSL certificate issues
- Other unexpected errors
If this field is left empty, no notifications will be sent.
Technical Contact Email Throttle Minutes
To prevent email spam, you can set a Technical Contact Email Throttle Minutes value that defines the minimum time interval between notifications for the same type of error.
For example, if you set the throttle to 5 minutes and your validator generates the same error 5 times within 1 minute, only one notification email will be sent. Subsequent notifications for the same error type will be suppressed until the throttle period expires.
This throttling mechanism ensures you stay informed about issues without being overwhelmed by duplicate notifications.
Bypassing Validator
In some cases, you may want to allow appointments to be created even when your validator returns an error. This can be useful for maintaining operational continuity while still collecting validation feedback.
You can enable this behavior by setting the Create Appointment on External Validation Failure setting to "Yes". When this option is enabled:
- Appointments will be created even if your validator responds with an error
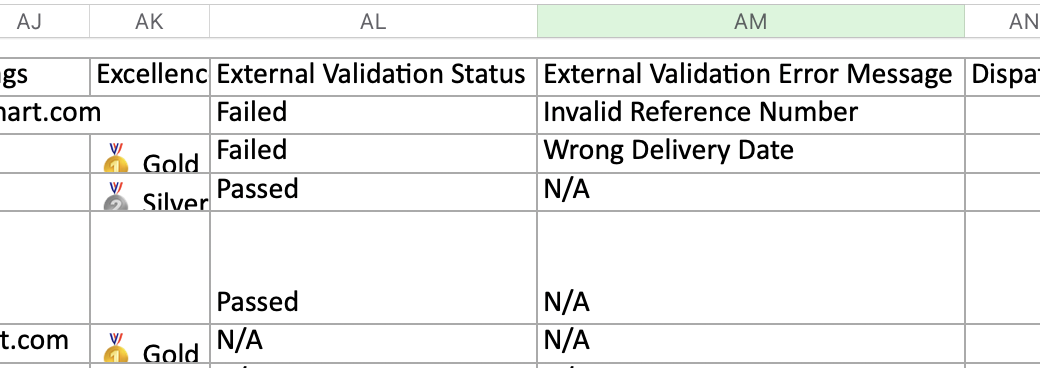
- The error message returned by your middleware will be stored along with the appointment
- You can review these validation errors by exporting appointment data from the Insights > Reporting section of the application
This feature allows you to maintain appointment scheduling availability while still capturing validation issues for later review and analysis.
Troubleshooting
First and foremost, ensure you have access to the logs of your middleware server. This will be the best place to start debugging any issues. If you're middleware is not properly responding with the error message in the format described above, then Opendock will not be able to display the error message to the user.
Some other common issues to look out for:
- Ensure your middleware is accessible from the public internet (if you're using a local development server, it may not be reachable by Opendock). This one is easily tested by trying to access your validator URL from an application like Postman or cURL.
- Ensure your middleware is responding within 8 seconds. If it's taking longer, then Opendock will timeout and the
TIMEOUT_ERRORmessage will be displayed to the user. - Ensure your middleware SSL certificate is valid. It is common for URLs to be inaccessible if the SSL certificate is expired or invalid. Remember, Opendock requires HTTPS connections for this feature.
- Take advantage of the technical notifications to monitor the health of your validator.
Need more help?
Please reach out to our support team to get help with any questions, or join our API Slack Workspace.
Appointment Validation V1 (Legacy)
PO validation is a feature allowing facilities to enforce an accurate PO # or reference # input before scheduling an appointment. This can be enforced for both carrier and warehouse scheduling users. Facility operators want this feature to protect their schedule from abuse and incorrect carrier bookings. While this isn’t a substantial problem, there is a perception it would be a significant problem and PO validation provides a safe guard. It can add future value and capability by ensuring the PO # is valid based on a list of PO #s in another system. By “matching” PO #s and ensuring validity, it can give us the opportunity to share other data back and forth between systems with the PO # as a unique identifier.
Setup Guide for PO Validation using Google Sheets
Google Sheets Setup
- Create a new Google Sheet
- Use an easy to remember file name for reference like “PO Validation Test Nova”
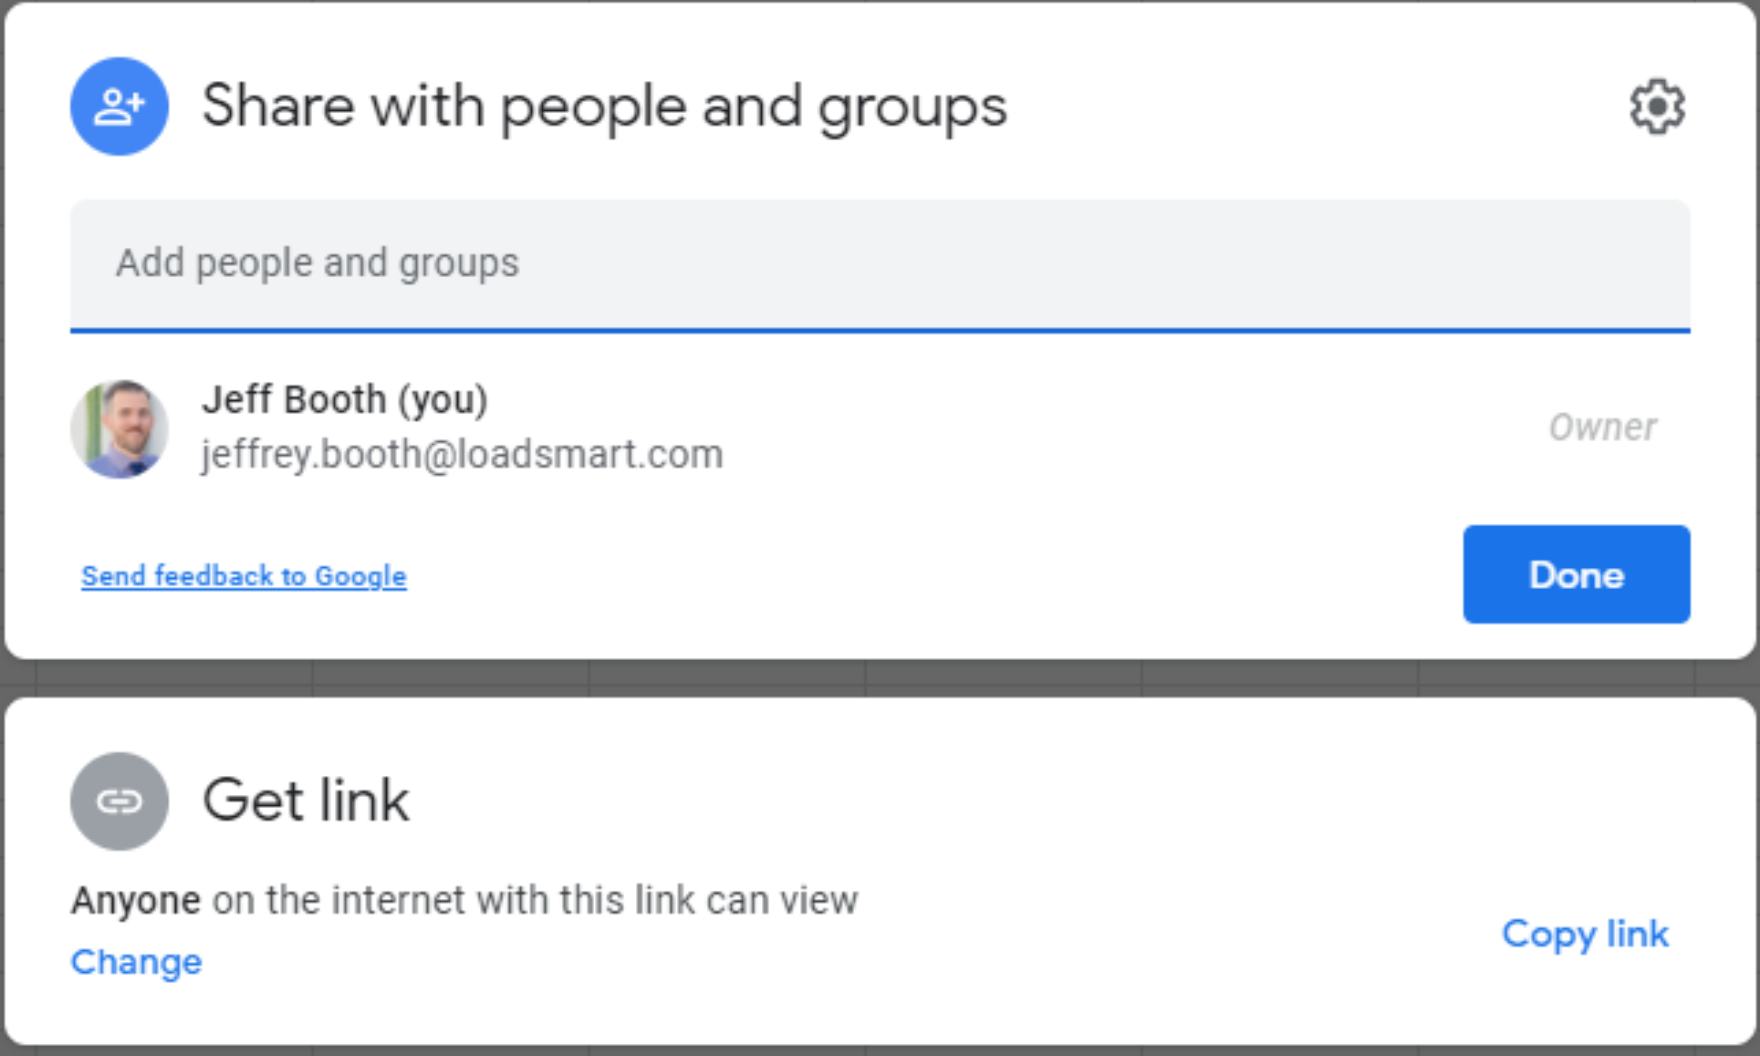
- Set sharing options to public by clicking Share green button in the top right corner and changing the Get link
section to Anyone on the internet with this link can view.
- In Column A & Row 1 of the Google spreadsheet create a label for the column
RefNumberto identify the data - In Column A create a list of RefNumbers (PO #s) that will serve as example valid PO #s. Create as many as you like
and they can include letters or numbers.
- Fields are case sensitive (
PO123is not the same aspo123) - Internal spaces count (
PO 123is not the same asPO123) - Leading/trailing break (
PO123will never work)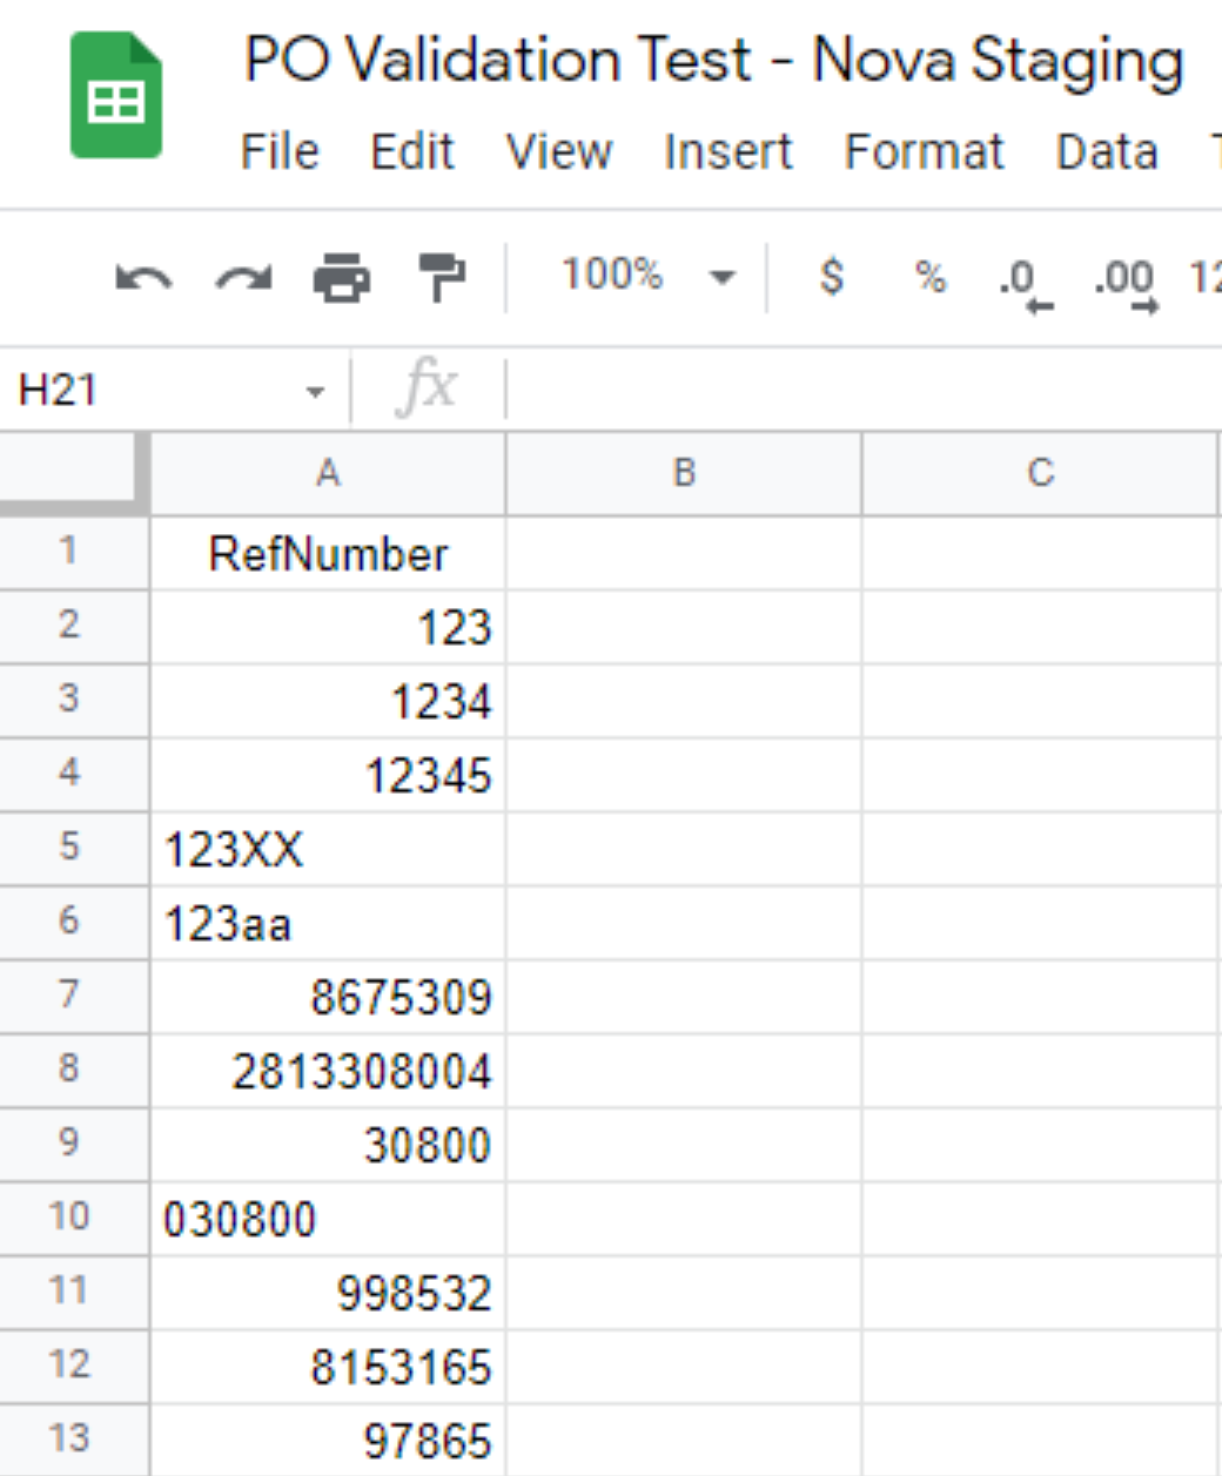
- Fields are case sensitive (
- This list will contain all of the valid PO #s which means when booking an appointment you will only be able to
proceed by entering a PO # that is in this list. Any number not in this list will give an error message
Reference Number ‘####’ is not validand not allow you to schedule an appointment.- This applies to both internal (warehouse) and external (carrier) users.
Nova Setup
- Sign into Nova account and open the Warehouses tab for a list of all warehouses within your org
- Click the name of the warehouse or the blue pencil icon on the far right of the screen to edit the warehouse configuration
- On the Settings tab scroll down until you see the field RefNumber (PO Number) Validation URL field with a blank field beneath it
- This field requires a URL to any system that will return valid PO numbers to be read and used by Nova for validation
- Copy and paste the core URL of your Google Sheets link into the field. First make it shareable and then copy and
paste the link from the sheet itself in the warehouse PO validation
- You will need to remove everything after the last “ / “ including the / itself
- For example, this Google Sheet URL: https://docs.google.com/spreadsheets/d/1WaBlIu7Ogwlv8XL1mDLIo13KgCGpTCSD7jGQ-QZKbWw/edit#gid=0
- Remove the following “/edit#gid=0”
- This will leave the remaining core URL for your Google Sheet: https://docs.google.com/spreadsheets/d/1WaBlIu7Ogwlv8XL1mDLIo13KgCGpTCSD7jGQ-QZKbWw
- You will need to remove everything after the last “ / “ including the / itself
- Click Save Warehouse in the bottom right corner of the page
- Remember, PO Validation is being applied at the warehouse level. This means if your org has multiple warehouses, the
PO validation will only be applied to the warehouse configuration you edited.
- If you wanted to apply the same Google Sheet to multiple warehouses, you can paste the same link into each
individual warehouse configuration RefNumber (PO Number) Validation URL field.
- If you wanted to apply the same Google Sheet to multiple warehouses, you can paste the same link into each
individual warehouse configuration RefNumber (PO Number) Validation URL field.